Monday, 29 June 2020

Useful Chrome Extensions for Google Meet

Here are some useful extensions for Google Meet.

Meet Auto Admit

If you install this extension in chrome then in Google meet rooms it will automatically lets users login by clicking the admit button on the popup.
No need to click on admit button to admit people to the meeting.

Google Meet Attendance

The extension records which students attended, when they arrived and how long they stayed with all of the information displayed in a tidy HTML report.
You can also donwload the information as a .csv file.  It also allows you to create a class list which you can create for each class. This makes it convenient to records the list of students who attended the meeting.


Google Meet Grid View

This extension adds a button to the top right bar (next to chat & participant list) to enable grid-view in Google Meets. Grid view gives every participant an equal sized video for use in meetings without a primary speaker (such as working from home silent meetings).


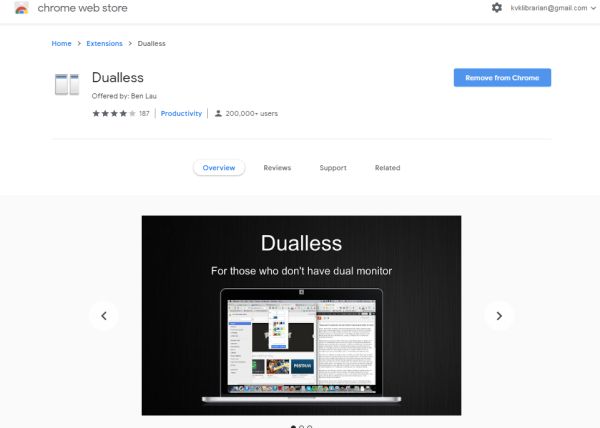
Dualless

Dualless is a poor man's dual monitor solution. It splits your browser windows into two by just 2 clicks. The ratio can be adjusted according to your needs. useful if you are presenting your screen and want to a have a look at the meeting too. You can keep the browser windows side by side.


Monday, 15 June 2020

Apowersoft Free Online Screen Recorder - Tools to Record your screen

Apowersoft Free Online Screen Recorder  is a free online screen recorder that allows you to record your screen. Apowersoft Free Online Screen Recorder is completely free to use, with no time limitations, paywalls or watermarks. It does not require Java Applet, but you need to install a launcher if it's the first time using it.  You can then record screen online without limits afterwards.


Features
Export videos to MP4, WMV, AVI, FLV, MPEG, VOB, ASF and GIF
Aside from recording screen with audio simultaneously, you're also empowered to add your webcam into screen recording for creating instructional videos. Both your demonstration and screen activity will be recorded properly.
Make your recorded video instructive by annotating with lines, text, callouts, highlights and more on a timely basis

How to Record Your Screen

Go to https://www.apowersoft.com/free-online-screen-recorder
Click on Start Recording
If you are using it for the first time, you will have to download the launcher application and install it. The launcher application is a very small file that will be downloaded quickly. Click on the apowersoft launcher to install it. Once it is installed, you are ready to start recording
Click on Start Recording and click Open Apowersoft Launcher.exe. The following toolbar will appear and you can select the required options and click REC button to start recording.

Once the recording starts, the toolbar will change to provide different to tools to add text, annotations, drawings etc to the screen.
Click on the stop button to finish recording. Your recorded video will open in a window and at the bottom you will find options to save the video to your computer.

Watch the video to learn how to record your screen using Apowersoft Free Online Screen Recorder


More Free Softwares

OBS Studio

OBS Studio is  a free and open source software for video recording and live streaming. It is ad-free and there is not time limitations for the recording. This needs to be downloaded and installed on your computer and may take some time to setup. Download suitable installer (32 bit or 64 bit for your OS.
Basic Requirements Windows:
DirectX 10.1 compatible GPU
Windows 7 SP1 or newer
This one is not so easy to setup and use compared to the others.
Once you get familiar with the interface, it is a powerful recorder

Screen Castify

Screen Castify is a Chrome extension that can be added to your browser to start recording. There is a time limit of 5 minute per video.

Screencast-O-Matic

Another free and easy to use screen recorder. It also has a time limitation of 15 minutes.


Sunday, 14 June 2020

VSDC Free Screen Recorder Software

 VSDC Free Screen Recorder Software

The program is intended for capturing desktop screenshots and creating video files of any format. You can capture the entire desktop or a specific area only. The software can record audio or voice from various external sound devices, such as a microphone or line in. That is why you can use this program to easily create video tutorials and presentation
You can also use the recorders drawing tool to draw or write something on your screen while recording. This will be highly useful when you are creating tutorials.

The overlay option provides the facility to highlight mouse cursor position and mouse clicks.
It is a small utility to record your screen.
You cannot record your webcam using this software, it will simply record your screen. The quality of the video is good.

You can download Free Screen Recorder and use it absolutely free of charge! There are no advertisements or other bundled malware.


The software can be downloaded from here

You can also download their Free Video Editor, which has the facility to video capture and screen capture. They have also got a free video converter and audio converters for download at http://www.videosoftdev.com/

Saturday, 13 June 2020

Google Family Link - Setting Up the Devices


Family Link from Google is an excellent tool to help your child be safe on the internet. It may not be a perfect tool, but it can help the parents to control the online activities of their children to an extent. The app is meant to help parents remotely control and keep track of their children’s Android device activities and help them set digital ground rules by managing what their kids are up to and what Google Accounts, devices and apps they are using. Parents can also manage some of their child's account settings on a web browser. Parents can manage their child’s Chromebook and account settings, and set website restrictions.

The app allows parents to view the weekly and monthly activity reports of their wards, it also helps them to limit the device usage by configuring a maximum number of hours that their kids are allowed to spend on the internet. Parents can also set the devices to be automatically be locked out during their child’s bedtime.

Requirements

  • A Google Account for your child (you can create the account as given in the previous tutorial or you can do this within the Family Link app)
  • An Android device for your child that’s running Android 7.0 Nougat or later (a few devices running Android 5.0 and 6.0 (Lollipop and Marshmallow) may also work)
  • Your own Android device running versions 5.0 (Lollipop) and higher, and iPhones running iOS9 and higher.
  • Your own Google Account

Family Link For kids and teens
Family Link runs on Android devices running version 7.0 (Nougat) and higher. Devices running Android versions 5.0 and 6.0 (Lollipop and Marshmallow) may also be able to run Family Link. 
Google Family Link for children & teens is a companion app that can be installed on the child's device.

Family Link For parents
Family Link for Parents is to be installed on the Parent's device to manage the accounts.
Parents can run Family Link on Android devices running versions 5.0 (Lollipop) and higher, and iPhones running iOS9 and higher.

We have already created an account in the previous tutorial. Now we will learn how to setup the Family Link.

The Family Link App for your Android device can be downloaded from Google Play Store.


Google Family Link for children & teens app is to be installed on the device(s) you wish to supervise, and the Family Link app is to be installed on your device.

Visit Play Store and click on Install to install the app in your device.
Once installed Open the app.
Go through the information screens at the beginning and then click on Get Started to setup the app.
Select your Google Account or login to the Google Account  that is given as parental account while creating your child's account. You will find your child's account already added to Family Link.

Click on View

Click on Manage  to manage your child's account.
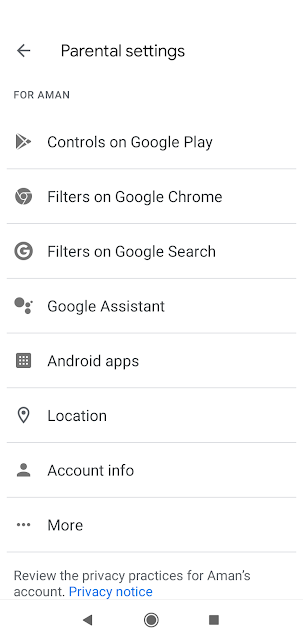
You can setup the following

Controls on Google Play

The following options are available for Google Play Store
  • All content (Require approval for all downloads, including free content and apps)
  • All paid content (Require approval when purchasing paid apps and media, but not for free downloads)
  • Only in-app purchases (Only require approvals when trying to buy products in an app or game, such as Fortnite or Pokemon Go; all other purchases are allowed)
  • No approval required (You will not be notified of purchases/downloads)
You can select any one of the four options as you think appropriate for your child.

Content Restrictions
You can also select what your child can browse on Google Play Store. Here you can setup the Apps & Games rated for age (from 3+ onwards), films by rating (U, UA, A, S), Books and Music.

Filters on Google Chrome

Here you can decide whether to allow all sites or instruct Chrome to try to block mature sites. The filters are not perfect, but will definitely block explicit sexual and violent content.
Or you can select Allow only certain sites option and Manage Sites adding approved and blocked sites to the list. The child can send you a request to approve a site using his device.

Filters on Google Search

You can turn on Safe Search on Google  Search to prevent sexually explicit and violent content appearing from the search results on your child's device

Google Assistant

Here you can decide whether to allow your child to interact with apps for families made by third parties (companies other than Google)

Android Apps

Under this option you can see the app limits and activity for your child's device.

Location

If turned on, Location will help you to find your child's location if the child is signed in to the device

Other settings

You can allow Google Photos sharing and whether parental permission is required for your child to sign in to other platforms.

Google Family Link will not allow you to see your child's search history, emails or monitor phone calls remotely.

Setting Up the Child's Device

Install Google Family Link for Children and Teenagers from Google Play Store on your child's device. 


Open the App. 


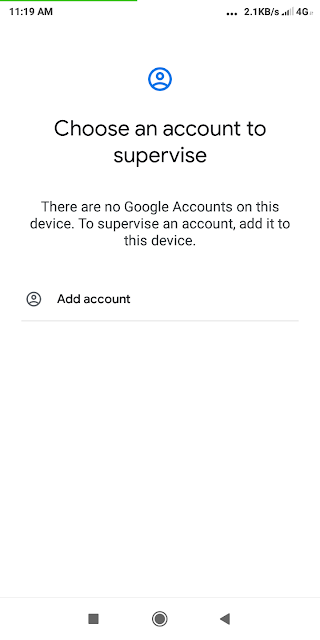
Select This Device on choose an account to supervise
Click on Add an Account
Sign in using your child's account.
Click on your account and sign in to grant parent permission.
Accept the agreement by clicking I Agree
In the next screen setup various options for the child account on the device. 


The setting you have made on the parental device will reflect here. 
Click Next
Click Next to install Family Link Manager. Give the device a name so it will help you to manage the device easily from your device.
Now the list of apps installed on the child's device will be displayed for review. You can keep or remove the apps individually here. Once finished, click Next
On the Activate Family Link Manager click on Next
Then click Activate this device admin app at the bottom of the screen. Read the onscreen warnings and click Accept. You can now setup backup & restore, location and usage date options for this device now. Finally click on Accept.
Once the the devices are connected you will get a confirmation message. 


Click Next to finish.
Now you can hand over the device to your child's use. He/she can use the device to access apps/site as per the restrictions set by you.

Now your child's name will appear on Family Link app on your device. You can now manage your child's account and activity remotely.

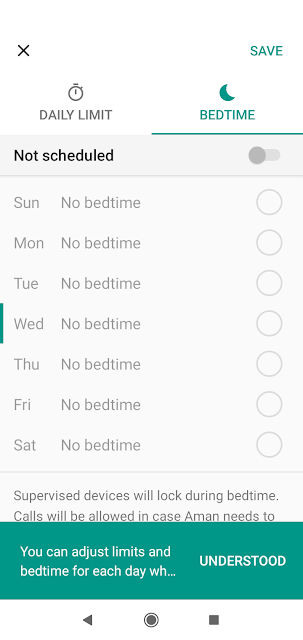
When click on View against your child's name on your Family Link, you can manage settings as detailed above. You can add other children and also can invite up to four family members to the family group .You can also see the option to set daily limits or bedtime hours for your child's device by clicking Set Up under Screen Time


You can set up daily limit and bed time as shown in the screen below. 

The device will get locked when the time is up. Calls will be allowed, in case the child wants to call you.

The child's device will have the restrictions implemented now and will have the limited features available. Only one child account can be set up on a single device.

If you want to add an existing Google account of another child to your Family Link, you can click on the "+" icon above on Family Link's home screen. The following screen will appear.

Click No, if you haven't created an email id for your child yet. If your child has a gmail id click Yes
If you click on No, you can create a Google Account for your child by providing details as we have done previously


Friday, 12 June 2020

Create a Google Account for your Child and Manage it through Google Family Link

 The COVID lock down has made it now necessary for our children to have a Google account to access the online classes conducted by the schools through Google Classroom and other virtual classroom platforms. Most of the cases the parents are giving their wards their own e-mail id to join the classroom. This may create many practical difficulties for the students, parents and teachers. For parents, it may not be advisable to let their child use their Google accounts as that may cause problems. Creating another ID in parents name for this purpose may be a good idea. But, as the students are enrolled under the name of the parents in Google Classroom, this creates practical difficulties for the teachers to manage the grades of their students properly.  


The minimum age limit to have a Google account is 13, but Google lets the parents to create  a Google Account for their child under 13 (or the applicable age in your country), and manage it using Family Link.With Google Accounts, children get access to Google products like Search, Chrome, and Gmail, and you can set up basic digital ground rules to supervise them. 

Let's see how to create a Google Account for your child.

Creating a Google Account for your child is very simple. It can be done either through the Family Link App or through Google Account Signup.

Google Account Signup
Enter the First Name and Last Name of your child
Select an email id you want for the child
Enter a password
Click on Next. 

Provide your mobile number and recovery email address. Also enter date of birth and gender of your child.
Click Next

As you are creating an account for you child and Google identifies the age of the child from the date of birth given in the previous step this screen will appear asking for the parent to sign in to their account to confirm. Enter your email id and click on Next.
The Parental consent form with Family Link disclosure for parents of children under the age of 13 (or the applicable age in your country) will appear now. You will have to read the disclosure to understand important details regarding Google Account details of your child, what you can do, how you can manage your account and what personal information Google collect.


Check the two I agree... check boxes and click on Agree button to continue
Now you will have to enter your password (password for the parent's email id to give consent)
Click on Next and the account will be created and you will see the information regarding your child's account. 

What parents can manage
Until your child reaches 13 (or applicable age in your country) and decides to manage his account on his own, you can do things such as:
  • Update your child's account info & some settings
  • Such as his name and birthday.
  • Delete his account
  • You can recover his account for a limited period of time after you delete it.
  • Manage his activity controls
  • You can manage settings such as how Google collects your child's Web & App Activity.
Click on Next 
Another window appear asking you to start and manage a family group
 The Google Family Group will help you to manage all the Google accounts of your family. You can create accounts for your children and another parent can be added to manage the accounts. Click on I agree button.
You will have to verify your child's info on the next screen.
Google will create an account for your child and the following confirmation will appear.
Click on Continue and you will be taken to you Manage Account page for your child where you can change the personal information, set up privacy information and secure the account.
Now your child's Google Account is ready and it can be managed through Family Link. For this you need to install Google Family Link for Parents on your device and Google Family Link for children & teens on your child's device. 
How to setup the devices is explained in the next tutorial.