Saturday, 13 June 2020

Google Family Link - Setting Up the Devices


Family Link from Google is an excellent tool to help your child be safe on the internet. It may not be a perfect tool, but it can help the parents to control the online activities of their children to an extent. The app is meant to help parents remotely control and keep track of their children’s Android device activities and help them set digital ground rules by managing what their kids are up to and what Google Accounts, devices and apps they are using. Parents can also manage some of their child's account settings on a web browser. Parents can manage their child’s Chromebook and account settings, and set website restrictions.

The app allows parents to view the weekly and monthly activity reports of their wards, it also helps them to limit the device usage by configuring a maximum number of hours that their kids are allowed to spend on the internet. Parents can also set the devices to be automatically be locked out during their child’s bedtime.

Requirements

  • A Google Account for your child (you can create the account as given in the previous tutorial or you can do this within the Family Link app)
  • An Android device for your child that’s running Android 7.0 Nougat or later (a few devices running Android 5.0 and 6.0 (Lollipop and Marshmallow) may also work)
  • Your own Android device running versions 5.0 (Lollipop) and higher, and iPhones running iOS9 and higher.
  • Your own Google Account

Family Link For kids and teens
Family Link runs on Android devices running version 7.0 (Nougat) and higher. Devices running Android versions 5.0 and 6.0 (Lollipop and Marshmallow) may also be able to run Family Link. 
Google Family Link for children & teens is a companion app that can be installed on the child's device.

Family Link For parents
Family Link for Parents is to be installed on the Parent's device to manage the accounts.
Parents can run Family Link on Android devices running versions 5.0 (Lollipop) and higher, and iPhones running iOS9 and higher.

We have already created an account in the previous tutorial. Now we will learn how to setup the Family Link.

The Family Link App for your Android device can be downloaded from Google Play Store.


Google Family Link for children & teens app is to be installed on the device(s) you wish to supervise, and the Family Link app is to be installed on your device.

Visit Play Store and click on Install to install the app in your device.
Once installed Open the app.
Go through the information screens at the beginning and then click on Get Started to setup the app.
Select your Google Account or login to the Google Account  that is given as parental account while creating your child's account. You will find your child's account already added to Family Link.

Click on View

Click on Manage  to manage your child's account.
You can setup the following

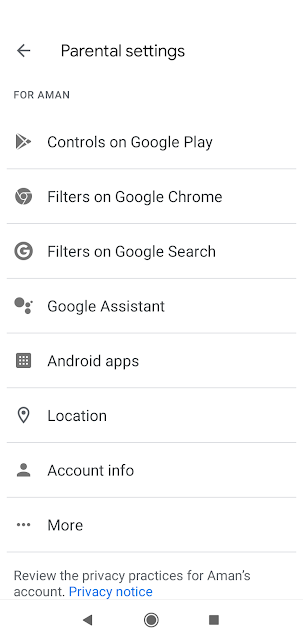
Controls on Google Play

The following options are available for Google Play Store
  • All content (Require approval for all downloads, including free content and apps)
  • All paid content (Require approval when purchasing paid apps and media, but not for free downloads)
  • Only in-app purchases (Only require approvals when trying to buy products in an app or game, such as Fortnite or Pokemon Go; all other purchases are allowed)
  • No approval required (You will not be notified of purchases/downloads)
You can select any one of the four options as you think appropriate for your child.

Content Restrictions
You can also select what your child can browse on Google Play Store. Here you can setup the Apps & Games rated for age (from 3+ onwards), films by rating (U, UA, A, S), Books and Music.

Filters on Google Chrome

Here you can decide whether to allow all sites or instruct Chrome to try to block mature sites. The filters are not perfect, but will definitely block explicit sexual and violent content.
Or you can select Allow only certain sites option and Manage Sites adding approved and blocked sites to the list. The child can send you a request to approve a site using his device.

Filters on Google Search

You can turn on Safe Search on Google  Search to prevent sexually explicit and violent content appearing from the search results on your child's device

Google Assistant

Here you can decide whether to allow your child to interact with apps for families made by third parties (companies other than Google)

Android Apps

Under this option you can see the app limits and activity for your child's device.

Location

If turned on, Location will help you to find your child's location if the child is signed in to the device

Other settings

You can allow Google Photos sharing and whether parental permission is required for your child to sign in to other platforms.

Google Family Link will not allow you to see your child's search history, emails or monitor phone calls remotely.

Setting Up the Child's Device

Install Google Family Link for Children and Teenagers from Google Play Store on your child's device. 


Open the App. 


Select This Device on choose an account to supervise
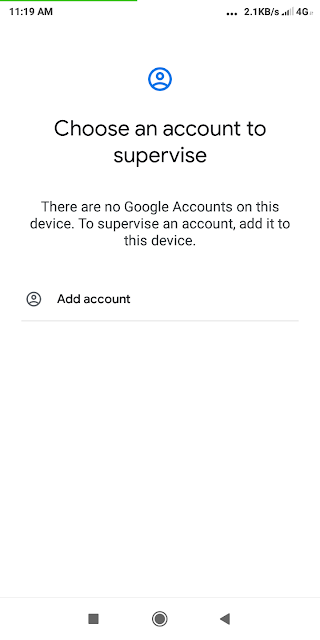
Click on Add an Account
Sign in using your child's account.
Click on your account and sign in to grant parent permission.
Accept the agreement by clicking I Agree
In the next screen setup various options for the child account on the device. 


The setting you have made on the parental device will reflect here. 
Click Next
Click Next to install Family Link Manager. Give the device a name so it will help you to manage the device easily from your device.
Now the list of apps installed on the child's device will be displayed for review. You can keep or remove the apps individually here. Once finished, click Next
On the Activate Family Link Manager click on Next
Then click Activate this device admin app at the bottom of the screen. Read the onscreen warnings and click Accept. You can now setup backup & restore, location and usage date options for this device now. Finally click on Accept.
Once the the devices are connected you will get a confirmation message. 


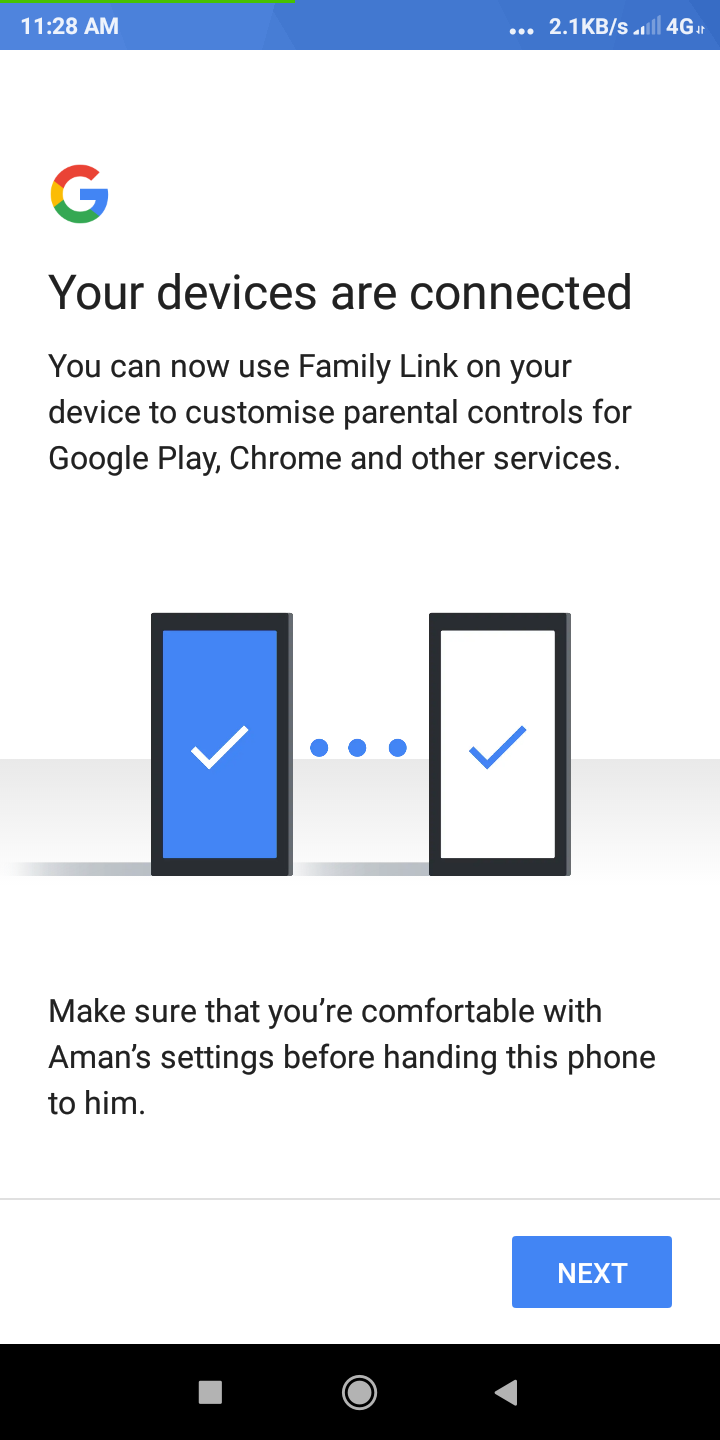
Click Next to finish.
Now you can hand over the device to your child's use. He/she can use the device to access apps/site as per the restrictions set by you.

Now your child's name will appear on Family Link app on your device. You can now manage your child's account and activity remotely.

When click on View against your child's name on your Family Link, you can manage settings as detailed above. You can add other children and also can invite up to four family members to the family group .You can also see the option to set daily limits or bedtime hours for your child's device by clicking Set Up under Screen Time


You can set up daily limit and bed time as shown in the screen below. 

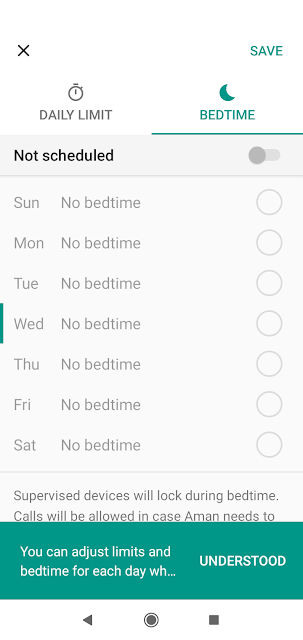
The device will get locked when the time is up. Calls will be allowed, in case the child wants to call you.

The child's device will have the restrictions implemented now and will have the limited features available. Only one child account can be set up on a single device.

If you want to add an existing Google account of another child to your Family Link, you can click on the "+" icon above on Family Link's home screen. The following screen will appear.

Click No, if you haven't created an email id for your child yet. If your child has a gmail id click Yes
If you click on No, you can create a Google Account for your child by providing details as we have done previously


Friday, 12 June 2020

Create a Google Account for your Child and Manage it through Google Family Link

 The COVID lock down has made it now necessary for our children to have a Google account to access the online classes conducted by the schools through Google Classroom and other virtual classroom platforms. Most of the cases the parents are giving their wards their own e-mail id to join the classroom. This may create many practical difficulties for the students, parents and teachers. For parents, it may not be advisable to let their child use their Google accounts as that may cause problems. Creating another ID in parents name for this purpose may be a good idea. But, as the students are enrolled under the name of the parents in Google Classroom, this creates practical difficulties for the teachers to manage the grades of their students properly.  


The minimum age limit to have a Google account is 13, but Google lets the parents to create  a Google Account for their child under 13 (or the applicable age in your country), and manage it using Family Link.With Google Accounts, children get access to Google products like Search, Chrome, and Gmail, and you can set up basic digital ground rules to supervise them. 

Let's see how to create a Google Account for your child.

Creating a Google Account for your child is very simple. It can be done either through the Family Link App or through Google Account Signup.

Google Account Signup
Enter the First Name and Last Name of your child
Select an email id you want for the child
Enter a password
Click on Next. 

Provide your mobile number and recovery email address. Also enter date of birth and gender of your child.
Click Next

As you are creating an account for you child and Google identifies the age of the child from the date of birth given in the previous step this screen will appear asking for the parent to sign in to their account to confirm. Enter your email id and click on Next.
The Parental consent form with Family Link disclosure for parents of children under the age of 13 (or the applicable age in your country) will appear now. You will have to read the disclosure to understand important details regarding Google Account details of your child, what you can do, how you can manage your account and what personal information Google collect.


Check the two I agree... check boxes and click on Agree button to continue
Now you will have to enter your password (password for the parent's email id to give consent)
Click on Next and the account will be created and you will see the information regarding your child's account. 

What parents can manage
Until your child reaches 13 (or applicable age in your country) and decides to manage his account on his own, you can do things such as:
  • Update your child's account info & some settings
  • Such as his name and birthday.
  • Delete his account
  • You can recover his account for a limited period of time after you delete it.
  • Manage his activity controls
  • You can manage settings such as how Google collects your child's Web & App Activity.
Click on Next 
Another window appear asking you to start and manage a family group
 The Google Family Group will help you to manage all the Google accounts of your family. You can create accounts for your children and another parent can be added to manage the accounts. Click on I agree button.
You will have to verify your child's info on the next screen.
Google will create an account for your child and the following confirmation will appear.
Click on Continue and you will be taken to you Manage Account page for your child where you can change the personal information, set up privacy information and secure the account.
Now your child's Google Account is ready and it can be managed through Family Link. For this you need to install Google Family Link for Parents on your device and Google Family Link for children & teens on your child's device. 
How to setup the devices is explained in the next tutorial.

Friday, 29 May 2020

Etiquette on WhatsApp Groups


WhatsApp has revolutionized the way we communicate. The ability to convey messages instantly to the class through the Class Group is very convenient to all.

Listed below are my thoughts on the way people post things on WhatsApp. I felt we need to follow some etiquette to put WhatsApp to better use. These are meant mainly for the Class Groups we maintain in our Vidyalaya to connect with our classes during this lockdown.

Thursday, 14 May 2020

Create a Quiz in Google Form

Google Form can be used for creating gk quizzes, conducting your class tests, getting feedback from your students and conducting surveys or polls. Creating a quiz or test using Google Form is quite simple. The following video will demonstrate how to create a quiz using Google Forms.

First sign in  to Google Forms.

Sunday, 10 May 2020

How to Submit Your Blog to Search Engines

Have you tried searching your blog on Google and not able to find it indexed on Google?
The reason is very simple: Google is not aware of your blog's existence. Wondering why? Normally search engines like Google discover new websites/blogs by crawling the web. They find new links on existing websites and follow them. If your website is a few days/weeks old and is not linked from other websites, most probably it will take some time to search engines to find your blog and index them automatically.
So, it is effective if you submit your blog/website to search engines like Google. We will see how to submit your blog to search engines.

Submit Your Blog to Google

You can submit your blog to Google by logging into Google Search Console. Google Search Console is a web service by Google which allows webmasters to check indexing status and optimize visibility of their websites. This tutorial is for blogs created on Blogger platform. You can also submit sites/blogs created using other platforms, but the site ownership verification process should be completed to get the site/blog to be added to Search Console. WordPress site hosted free may not be able to complete the verification process as you are not allowed to upload the verification file or create meta tags required for site verification.

 Follow these steps to submit your blog to Google Search Console

Go to https://search.google.com/search-console/welcome

In the domain enter the URL of your blog without the http or https prefix (e.g kv-library.blogspot.com)
Click on Continue.. Google will verify ownership. As it is on Blogger domain Google will auto-verify your blog.
You will be taken to Google Search Console.

Next, you will have to submit a sitemap

Sitemap of Your Blog

A sitemap, as the name suggests, is an actual map of your blog. A sitemap is either an XML or HTML file that contains all the URLs of the pages inside your blog. By default your blog will have sitemap that will tell search engines about the latest posts on you blog. Your blogs sitemap will be located at
http://yourblogdomainname.blogspot.com/atom.xml?redirect=false&start-index=1&max-results=500
Replace yourblogdomainname with the domain name of your blog.

Now go to Blogger settings->Search preferences and click on Edit against add custom robots.txt option and enable it by selecting Yes option.
Inside the robots.txt box enter the following


Don't forget to change give the correct url of your blog instead of yourblogdomainname.blogspot.com
Click on Save changes
If you have more than 500 pages you can add more sitemaps changing the startindex and max-results values.

Submit Your Sitemap to Google Search Console

Go to Google Search Console by clicking Edit option against Google Search Console under Search Preferences. Or you can go to https://search.google.com/search-console/

In Search Console, click on Sitemaps option in the menu on the left and enter your sitemap URL (i.e. http://yourblogdomainname.blogspot.com/atom.xml?redirect=false&start-index=1&max-results=500) and click Submit (see the screenshot below)


The sitemap will be added to the Search Console. Now your blog is ready for crawling and indexing. You can find the number of pages crawled and indexed in Google webmaster tools.

That's it. Now you can search your blog URL in Google and you will find it indexed. Your blog will appear in search results depending on the content of your blog. 
You can visit Search Console later to see your blog's search performance statistics and other insights.

Submit and Individual Page to Google

If you have added some new and important content and want to get it indexed by Google quickly, you can submit an individual page to Search Console.
To do this Go to Search Console and click on URL Inspection. If you have multiple blogs entered in Search Console, select the relevant property (blog) from the drop down on top left.
Then copy and paste the complete URL of the page inside the URL Inspection textbox and press Enter key.
Google will retrieve data from its index and will inform you the status. Most probably it will say the URL is not indexed as it is a new page. You can now click on Request Indexing to add it to the Google's indexing queue.

Bing is a web search engine owned and operated by Microsoft and is the third largest search engine globally. You can submit the sitemap of your blog to Bing to get indexed by the search engine.

How to Submit Your Blog to Bing

You can sign in using your Microsoft/Google/Facebook account.
Once logged in to Bing Webmaster Tools you can either add your site using the Add a Site option or you can import your site from Gooogle Search Console if you have already added your site to Search Console.

If you use add a site feature, you can provide further information like the sitemap url and your details.
If you select import from Search Console, you can Sign in to your Google account and import the site information from there. This will not require you to verify the blog ownership again at Bing.

You will have verify ownership of your site by adding a meta tag to your blog. Bing will provide you with a meta tag which will look something like this:

                <meta name="msvalidate.01" content="SOMEVALUEHERE" />

To add meta tag, go to Theme->Edit HTML. When the HTML code editor opens, click inside the box and press Ctrl+F to open a search box. Now type </head> in the search box and press Enter Key. When the </head> tag is found paste the meta tag from Bing just before the </head> tag. Now Click on Save Theme to save changes. Take care not to delete the </head> tag.

Go back to Bing Webmaster Tools and click on Verify button.

Yahoo is powered by Bing’s index, so by submitting to Bing, your site will automatically be submitted to Yahoo.

Saturday, 9 May 2020

Create a Horizontal Menu Bar with Sub Menu for Blogger

In this tutorial you will learn how to add a horizontal menu bar with submenu on your blog. Earlier we have used the pages and link list gadgets to create a horizontal menu. But these gadgets do not provide for submenus. Here we will learn how to create a menu using plain HTML and CSS.

Adding A Horizontal Menu With Sub Menus to Blogger

First, let's create the menu using HTML list. We make use the <ul><li> elements to make a list of links for the menu. The basic structure of <ul><li> elements are as follows
<ul>
  <li><a href="default.html">Home</a></li>
  <li><a href="contact.html">Contact</a></li>
  <li><a href="#">Links</a></li>
</ul>
You can see the <a> HTML tag is used for each <li> tag to provide links to the list item. A "#" can be provided where you don't want an item to be clickable.  You can add more links to the list by by copying the line <li>....</li> and changing the link and title for the list item (highlighted in red). These are the menu items. So we have three menu items in the list above. If you need to add submenu to any of the menu items above, you will have to add a list under the menu item. For example, you want to add two submenu items to the Links menu as follows
<ul>
  <li><a href="http://cbse.nic.in">CBSE</a></li>
  <li><a href="http://ncert.nic.in">NCERT</a></li>
</ul>

We will add the submenu as follows:
<ul>
  <li><a href="default.html">Home</a></li>
  <li><a href="contact.html">Contact</a></li>
  <li><a href="#">Links</a>
             <ul>
              <li><a href="http://cbse.nic.in">CBSE</a></li>
              <li><a href="http://ncert.nic.in">NCERT</a></li>
              </ul>
</li>
</ul>

Note that we just placed the new list just before the closing </li> tag for the menu item. We have given "#" instead the URL, as we do not want the menu to be linked to any website as it has submenu. You can copy and paste the lists and make changes to the menu as required. In the box below you can create your menu by modifying the list items. Remember that when you are deleting an item remove the complete line <li>...</li> , else it will not render properly. Only add menus that can be accommodated in a single line.


Copy the content inside the above box to clipboard.
Now go to blogger and login to your account.
Go to your "Layout" and on the "Page Elements" section:
  • Click on the "Add a Gadget" link just under your header image (cross-column 1)
  • From the Gadget's List, select "HTML/JavaScript" option.
  • Paste the copied HTML code inside the body. Do not provide any title to this gadget
  • Click on Save
If you view your blog now, you can see the menu bar added to the blog. We will have add some CSS styles to get it working.


Copy the complete CSS style text from the box above.

  • In Blogger, click on Theme and then click Customise button.
  • Click on Advanced tab on the left and then click on Add CSS option at the bottom
  • Paste the copied CSS Style inside the box.
  • Click on Apply to Blog

Now view the blog to see the menu working.
You can change the color of the background, link text, hover effects etc by making changes to the CSS Style. I have created a CSS Maker for your convenience where you can select the colors for your  menu and the generated CSS Style can be copied and pasted to get the desired effect.
Click here for the CSS Maker (The CSS Maker is only useful for this menu)

Friday, 1 May 2020

Google Classroom: Adding Classworks

 Google Classroom gives you the ability to create and assign work and conduct online tests to your students. To create new assignments, tests, or add materials and resources to your class, you'll have to use the Classwork tab.


Here adding classworks is demonstrated in two video tutorials.


Classwork Tutorial 1


Click here to learn how to create a class on Google Classroom
Classwork Tutorial 2